
WELCOME
The LocationsHub Guide
ADMIN
Create Your Account
Add or Edit Your Profile InfoReset Your Password
Change Your Password
Change Your Email
Update Credit Card Info
Purchase a Package
Cancel Your Package
Renew Your Account
Change Your Package
Why Your Listing Isn't Live
LOCATION
Add a New Location >
Delete a Location
Edit a Location
Edit Location Contact
Show or Hide Location Address
Search for Your Location
Share Your Location URL
PHOTOS
Upload Photos
Edit Photos
Rotate Photos
Sort Photos
Deleting Photos
LIGHTBOXES
What is a Lightbox?
Create a Lightbox
Sort Locations Within a Lightbox
Share a Lightbox
Managing your property listing(s) on LocationsHub is a simple process. The links on the left will walk you through the main process of listing your location. Bookmark this page for future reference in case you need a refresher.
1. Log In to Your LocationsHub Account
Log in to your LocationsHub account. This will take you to the Dashboard section.
NOTE: If you already have locations listed in your LocationsHub account, this page will be populated with those locations (as in the above image). If you’re a brand new user, this page will be a blank page with no existing location listings.
2. Add New Location
To add your location listing, click on the “+ Add New Location” link on the Left column.
3. Locality/Place
On the “Add Location” page, fill out all the sections in the Locality/Place tab. Make sure to complete these sections: Location Name, City/Town, and Zip/Postal Code. Those are the required sections. When you're done, click the “Next” button.
4. Location Details
The next page is the “Location Details” page. Fill out all the appropriate sections, such as Location Description, Internal Notes, Weblinks & References, etc.
In the Location Description, don't forget to include details such as:
Location name / descriptive title (such as "Windemere Cottage" or "1905 Victorian Home")
Square footage
Architectural style
Year built
Number of bedrooms & bathrooms
Special features of the property
Natural light
Extra spaces for makeup/wardrobeExtra spaces for film/lighting equipment
Parking for cast/crew/production vehiclesElectricity, wall outlets
Traffic/noise level (quieter is better)
Neighborhood safety
When you’re done, click on the “Next Step” button.

5. Location Categories
The next page is “Location Categories.” Fill out all the relevant sections on this page, including Select Category, Architectural Styles, etc. When you’re all done, click the “Next Step” button.
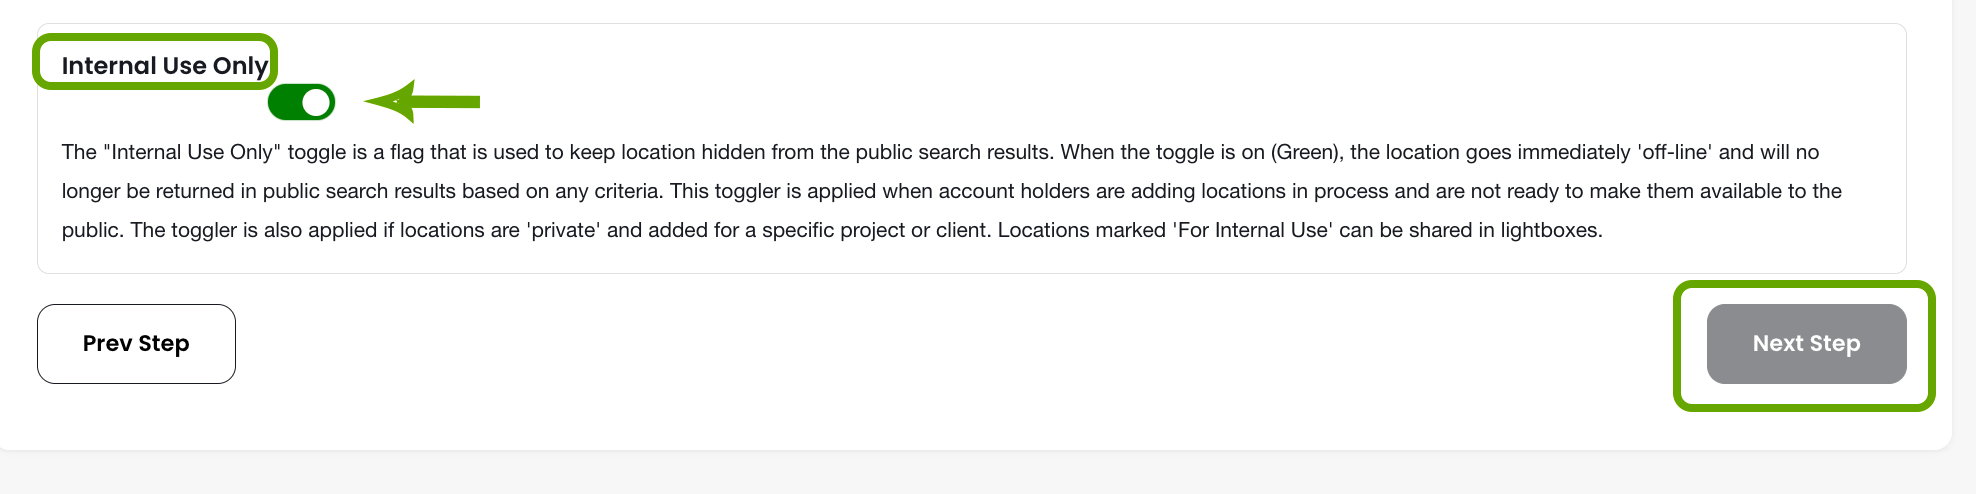
6. Internal Use Only
If you’re not yet ready to show your location to the public, toggle the “Internal Use Only” button to Green. This keeps your location private. When you’re ready to share the listing publicly, toggle the button back to grey. Don’t forget to click the “Next Step” button when you’re done.
7. Upload Images
Now it’s time to upload images of your location. Please note that without images, your listing will not be live and available for searching on LocationsHub.com.
On the “Upload Images” page, click on the “Browse Files” button to start uploading your photos. Make sure each photo is at least 900px in width. You can upload up to 25 photos for each listing.

After you’ve uploaded all the photos, click on the “Next Step” button to save your updates.

Remember that without photos, your listing will not be live and available for searching on LocationsHub.com.